Elevated Content kit
Get started here!
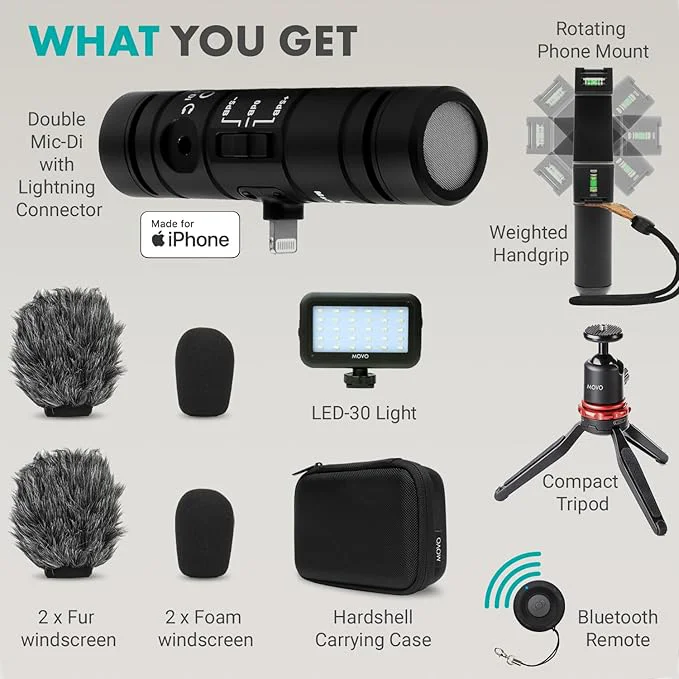
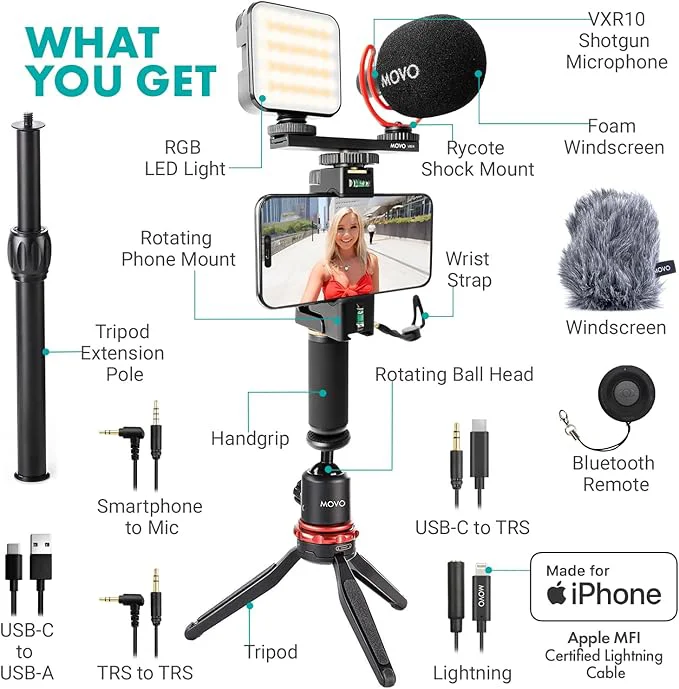
What's Included In The Kit
As an Elevate DDS client you should have received 1 of 2 different generation bundles. There are slight differences between generations, as the newest iPhone 16 has switched to USB-C as the main output on the bottom of the phone. If you received the 1st generation bundle, but don't have access to to an iPhone 15 or older, please let your Elevate DDS rep know. New clients as of 2025 will be receiving the 2nd generation bundle with adapters for iPhone 16 and newer.
Each Kit Contains:
- Microphone + Windscreens - The microphone on the 1st generation bundle will plug directly into the bottom of the iPhone. The 2nd generation should come with an adapter that plugs into the phone on one end, and the microphone on the other. We recommend utilizing a windscreen whether indoors or outdoors to cut down on outside/unwanted noise.
- LED Light Attachment - The light can help illuminate the subject when shooting without much natural lighting, and can substitute some light away from overhead lighting (we recommend filming in areas with good, indirect natural lighting with minimal overhead light).
- Rotating Phone Mount + Hand Grip - Your phone will sit in this mount at all times while filming. Whether utilizing the hand grip for moving shots, or non-moving video (using compact tripod), you'll want the phone tightened into this mount/holder.
- Compact Tripod - The 'Rotating Phone Mount' will screw into the compact tripod and sit atop the tripod. There is also a tripod extender that can be screwed in between the phone mount and the compact tripod. The extender will provide added vertical reach for your phone/camera.
- Carrying Case - The case can be used for safe keeping the microphone and attachments between uses.
- Bluetooth Remote - There is a bluetooth remote included. Elevate DDS has not tested the remote with different software updates, so we'd recommend just touching the record button on your phone for now. Elevate DDS can edit out portions of inactivity from the videos where necessary.
1st Generation Parts Bundle:
2nd Generation Parts Bundle:
Content Kit Setup
The setup is extremely simple, as each part should screw and unscrew together, and the microphones are plug & play (no software needed). In order for the LED light to work, you'll need to ensure the battery is charged first.
Start by unscrewing the weighted handle from the rotating phone mount. The handle from 1st generation components may not screw into the tripod, so removing it will do the trick. Next screw the phone mount into the compact tripod, or tripod extension pole (if using) and then into the tripod. Next tighten your iPhone into the mount and adjusting each tightening screw as needed to ensure the leveling bubbles are indeed level on your surface.
Next you'll want to plug in the microphone to your iPhone OR select the appropriate adapter for your iPhone version. The 2nd generation content kit should have all adapters needed for iPhone 7 to iPhone 16 (USB-C) and up. Be sure to use a windscreen over the microphone end on 1st generation kits. 2nd generation content kits will include a microphone + lighting mount that also attaches to the top of the rotating phone mount. You'll want to ensure everything is locked into place and adjust the phone to eye level, before recording.
Other Tips & Tricks for Quality Video
Use the above Content Kit Introduction video as a helpful guide on getting started with the Elevated Content Kit. This should provide some useful information on getting your quality up to snuff.
The 3 most important elements to remember are:
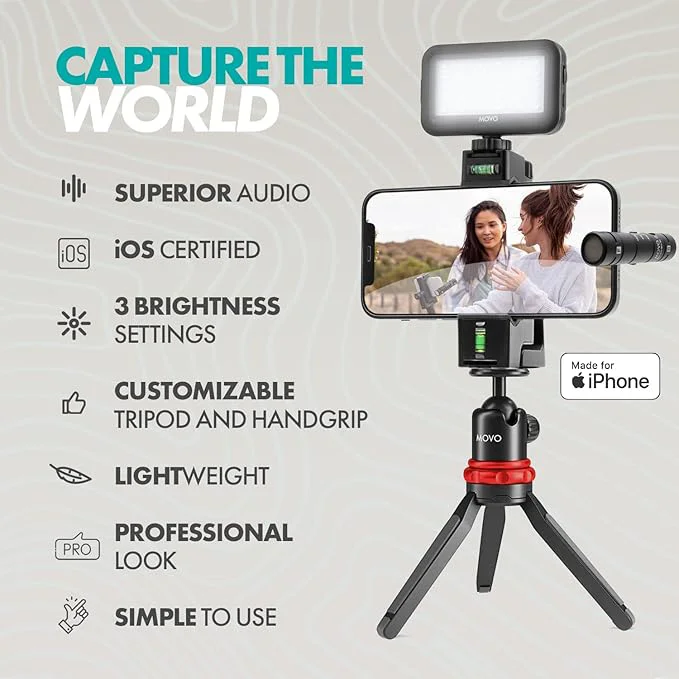
- Good lighting is key. The key to creating quality videos is all about lighting. Ensure that you've set up shop in an area with great lighting, either naturally, or utilizing artificial lighting. A lot of overhead lighting may cause unwanted shadows, so it's best to video yourself in well lit areas or supplement artificial light and/or use the Elevated Content Kit light. Try not to sit in an area with direct sunlight shining on your yourself or face, as this can cause unwanted shadowing.
- Quality audio is also crucial. Set up your iPhone between 3-6 feet away from you (or the subject). Ensure that you/the subject is fully within the frame of the video, but that the microphone is picking up the audio clearly. Make sure to film yourself during times when background noise is low or non-existent.
- Relax, breath & take pauses. Make sure not to talk to fast, and pauses during statements or ideas is key. If you make a mistake, take a pause, and repeat the statement. This way Elevate DDS can edit out the mistake between pauses. Super easy!
- Utilize 'Cinematic Mode' on your iPhone (available on iPhone 13 & greater w/latest iOS version). This setting produces GREAT subject videos (when a person is talking) with a cool depth of field. During action shots, you may need to switch to regular video, IF the depth of field is too big (iPhones can have a hard time keeping up with too many moving parts in the background).
*If you don't have cinematic mode, don't worry. Just use the standard video recording feature available on your iPhone version. - Remove Microphone to Hear Playback! Through trial and error, we've realized that you cannot hear the playback on your videos while the microphone is plugged in. Simply remove the microphone from iPhone before listening to the video playback in order to hear yourself.
- Pay Attention to Horizontal vs. Vertical Orientation - Some prompts may ask you to film vertically for use cases such as Instagram reels or YouTube shorts. Evergreen videos used on YouTube and website/blog posts, will need to be shot horizontally (Widescreen) for Elevate DDS purposes. The majority of prompts will need to be shot horizontally. Please be aware of how your phone is placed into the mount before filming/shooting for orientation.
Send Us Videos Using The Google Drive
Please upload the video to your Google Drive folder link that was provided to you by your Elevate DDS account rep. If you do not have that link, or are having issues with uploads, please reach out to your account rep for a solution.